Battery switch on travel trailer function is crucial for managing your RV’s power. Understanding how these switches work – whether it’s a simple 1-2-both, a rotary switch, or something more advanced – is key to avoiding electrical problems and ensuring a smooth camping experience. This guide breaks down the different types, their functions, troubleshooting tips, and safety precautions to keep you powered up on the road.
We’ll cover everything from the basic mechanics of how a battery switch works to integrating it with solar panels and inverters for maximum power flexibility. We’ll also show you how to diagnose common issues, safely perform repairs or replacements, and maintain your system for years of reliable service. Get ready to become a battery switch expert!
Types of Battery Switches in Travel Trailers
Choosing the right battery switch for your travel trailer is crucial for managing your power sources efficiently and safely. Different switches offer varying levels of control and complexity, each with its own set of advantages and disadvantages. Understanding these differences will help you select the best option for your needs.
Battery Switch Types
Travel trailers typically utilize a few common types of battery switches. These include simple on/off switches, 1-2-both switches, and rotary switches offering more complex configurations. Each type provides a different level of control over your house and chassis batteries.
1-2-Both Switches
These switches are the most common type found in travel trailers. They offer three positions: “1” (connects only the house battery), “2” (connects only the chassis battery), and “Both” (connects both batteries in parallel). Internally, these switches use a simple mechanism of contacts that are mechanically moved to connect or disconnect the battery terminals based on the switch position.
The advantage is their simplicity and low cost. However, they lack the finer control offered by more sophisticated switches. A disadvantage is the potential for accidental connection of both batteries if not handled carefully.
Rotary Switches
Rotary switches provide a more versatile option. They often feature multiple positions, allowing for more precise control over battery connections, including options to isolate both batteries completely. The internal mechanism involves a rotating selector that makes and breaks contact with different terminals, offering a more sophisticated configuration than the simpler 1-2-both switch. Rotary switches are generally more durable and offer greater control, but they are typically more expensive.
Some high-end models include additional features such as battery voltage monitoring.
So, you’re gearing up for a road trip in your awesome travel trailer? First things first: understand your power! Check out this guide on the battery switch on travel trailer function to avoid any dead-battery surprises. Knowing how to manage your trailer’s power is key, and then, of course, you’ll want to make sure you’re covered in case of emergencies.
Don’t forget to look into travel insurance options, like Aon travel insurance , for peace of mind on the road. Having a reliable plan for both your trailer’s power and your trip’s potential hiccups will make your adventure way smoother.
On/Off Switches, Battery switch on travel trailer function
The simplest type, these switches only allow for the connection or disconnection of a single battery at a time. They are typically used for individual battery isolation and are not commonly used for switching between multiple batteries simultaneously. The internal mechanism is straightforward, involving a simple on/off contact. They are inexpensive and easy to use but offer minimal control.
Comparison Table
| Switch Type | Cost | Ease of Use | Control Level |
|---|---|---|---|
| 1-2-Both | Low | High | Basic |
| Rotary | Medium to High | Medium | Advanced |
| On/Off | Low | High | Limited |
Function and Purpose of Battery Switches: Battery Switch On Travel Trailer Function
A battery switch in your travel trailer is a crucial component that controls the flow of power between your trailer’s house batteries and other electrical systems. It’s like a master control, allowing you to disconnect or connect different parts of your electrical setup, ensuring safe and efficient power management. This prevents accidental drain and protects your valuable equipment.Battery switches primarily protect your travel trailer’s electrical system from damage caused by over-discharge or short circuits.
By isolating the house batteries, the switch safeguards sensitive electronics, appliances, and the charging system itself from potential harm. This protection is especially important when the trailer is stored for extended periods or if there’s a problem with one of the batteries. Furthermore, it enables you to selectively power different circuits within your trailer, maximizing battery life and minimizing the risk of electrical issues.
Battery Switch and Power Management
The battery switch acts as an intermediary between your house batteries (which power your trailer’s lights, appliances, and other systems) and the charging system (either from shore power, your tow vehicle, or solar panels). It allows you to choose which battery bank provides power to the trailer and to disconnect the batteries entirely to prevent parasitic drain. For example, if you’re parked for a long time, you might turn the switch to the “off” position to prevent your batteries from completely discharging.
Conversely, when connected to shore power, the switch ensures the charging system correctly replenishes your batteries.
Safe Operation of a Battery Switch
Safe operation of your battery switch is paramount. Always refer to your specific switch’s instructions, as operation may vary slightly between models. However, a typical procedure would involve these steps:
- Identify the switch positions: Most switches have at least three positions: “Off,” “Battery,” and “Both.” “Off” completely disconnects the batteries, “Battery” connects only the house batteries, and “Both” connects both the house batteries and the charging system.
- Turn the switch to the “Off” position: This is the safest starting point, ensuring no power flows to the trailer’s systems. This prevents accidental discharge or short circuits when working on the electrical system.
- Perform any maintenance or work: Once the switch is off, you can safely perform any maintenance or repairs to your trailer’s electrical system.
- Select the appropriate position: After completing any work, select the desired switch position (“Battery” or “Both”) depending on whether you want to use only the house batteries or utilize the charging system as well.
- Verify power: After switching, check that your trailer’s electrical systems are functioning correctly. Note any unusual behavior.
Troubleshooting Common Battery Switch Issues
Dealing with a faulty battery switch in your travel trailer can be frustrating, but understanding the common problems and how to diagnose them can save you time and money. This section Artikels the typical issues, diagnostic methods, and repair or replacement procedures.
Battery switch problems often manifest as a complete lack of power, excessive heat generation from the switch itself, or visible signs of corrosion around the terminals. These issues can stem from various causes, including loose connections, damaged internal components, or simply age and wear. Proper diagnosis is key to effective repair.
Identifying Common Battery Switch Problems
Common problems include no power to the trailer’s appliances or lights, even with the battery charged. Overheating is another sign, often indicated by a burning smell or unusually warm switch housing. Corrosion, typically a green or white powdery substance around the terminals, can significantly impede current flow. Visual inspection should be your first step. Check all connections for tightness and signs of damage or corrosion.
Diagnosing Battery Switch Issues
A visual inspection will often reveal loose connections or corrosion. Tighten any loose connections carefully, using appropriate tools. Clean corroded terminals with a wire brush and baking soda solution. If visual inspection reveals no obvious problems, testing is necessary. Use a multimeter to check the voltage at various points in the circuit.
Check the voltage at the battery terminals, then at the input and output terminals of the switch. A significant voltage drop across the switch indicates a problem within the switch itself. If you are not comfortable working with electricity, seek help from a qualified technician.
Repairing or Replacing a Faulty Battery Switch
Minor issues, such as loose connections or light corrosion, can often be resolved with cleaning and tightening. However, a switch that consistently shows a significant voltage drop, is overheating, or exhibits internal damage will need replacement. Replacing the switch involves disconnecting the battery, carefully removing the old switch, and installing the new switch, ensuring all connections are tight and secure.
Remember to consult your travel trailer’s wiring diagram to ensure correct connections. If you lack experience with electrical work, professional help is advisable.
Troubleshooting Flowchart for a Non-Functional Battery Switch
The following flowchart Artikels a systematic approach to troubleshooting a non-functional battery switch. This logical process helps to quickly identify the source of the problem.
So, you’re prepping for your awesome travel trailer adventure? First things first: understanding your power is key. Check out this guide on the battery switch on travel trailer function to avoid any dead-battery surprises. Then, make sure you’re covered with solid travel insurance; I highly recommend looking into Aon travel insurance for peace of mind while you’re on the road.
Having both sorted will let you focus on enjoying the trip!
Start → Visual Inspection: Check for loose connections, corrosion, or physical damage. → If yes (issues found): Clean and tighten connections, repair or replace damaged parts. → Test: Check for power. → If yes (power restored): Problem solved. → If no (power not restored): Proceed to next step.
→ Voltage Test: Use a multimeter to check voltage at battery terminals, switch input and output. → Significant Voltage Drop Across Switch: Replace the switch. → No Significant Voltage Drop: Check wiring and fuses. → Problem in Wiring/Fuses: Repair wiring or replace fuses. → Problem not found: Seek professional help.
→ End
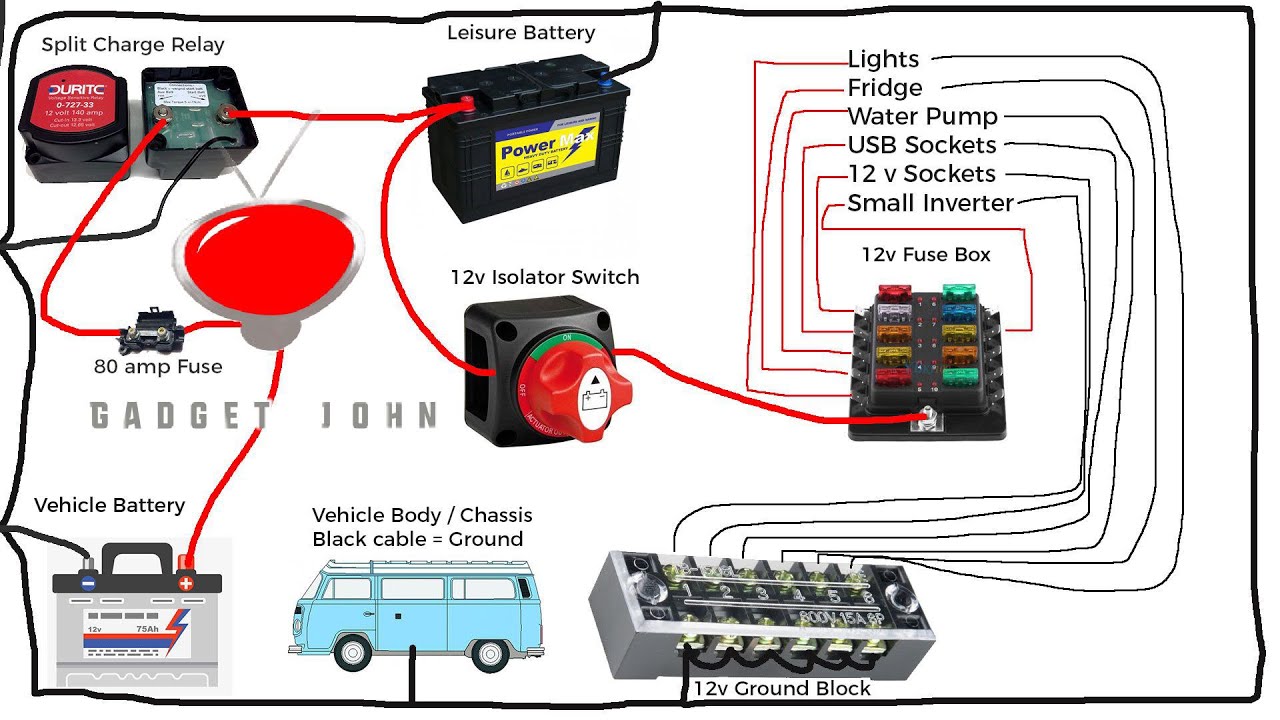
Wiring Diagrams and Connections
Understanding how to wire a battery switch in your travel trailer is crucial for safe and reliable power. A correctly wired system ensures your house batteries charge properly, and your appliances function as intended. Incorrect wiring, however, can lead to serious issues, including blown fuses, damaged components, and even fire hazards. This section will guide you through the process, focusing on safety and clarity.Proper wiring ensures efficient power distribution and prevents short circuits.
A correctly connected system allows for seamless switching between your tow vehicle’s charging system and your house batteries, while also providing the means to isolate the batteries when needed. Conversely, incorrect wiring can lead to a dangerous situation, potentially causing damage to your electrical system or even a fire. Therefore, careful attention to detail is paramount.
Simplified Wiring Diagram
Imagine a simple diagram. You have two batteries (labeled Battery 1 and Battery 2) connected in parallel. These are your house batteries. From the positive (+) terminals of both batteries, a wire runs to the input terminals of your battery switch. Similarly, a wire connects the negative (-) terminals of both batteries to the output terminal of your battery switch.
The output of the switch then leads to your RV’s main power distribution panel. From this panel, power is distributed to your appliances and lights. A separate wire runs from the tow vehicle’s charging system to a dedicated charging port on the battery switch, usually labeled “Charge.” This allows your tow vehicle to charge the house batteries.
Finally, a ground wire connects to the chassis of the RV for safety.
Connecting a New Battery Switch
Before starting any electrical work, always disconnect the negative (-) terminals of your batteries to prevent accidental shorts. Once disconnected, carefully trace the existing wiring to understand the current setup. Identify the positive and negative battery cables, the charging cable from your tow vehicle, and the cables leading to your power distribution panel. The new battery switch should have clearly labeled terminals for each of these connections.
Connect the wires to their corresponding terminals on the new switch, ensuring a tight and secure connection. Double-check all connections before reconnecting the battery negative terminals. After reconnecting the batteries, test the switch to ensure it functions correctly.
Necessary Tools and Materials
Proper installation requires the right tools. You will need a wrench or socket set to disconnect and reconnect battery terminals, wire strippers and crimpers to prepare and connect wires, a multimeter to test connections and battery voltage, and appropriate-sized wire connectors. Additionally, gather replacement battery cables if necessary, a new battery switch (of course!), and electrical tape or heat shrink tubing for insulation.
Always use appropriately sized wire connectors and ensure all connections are clean and secure. Remember safety first! Wear appropriate safety glasses and gloves throughout the process.
Mastering your travel trailer’s battery switch isn’t just about avoiding dead batteries; it’s about maximizing your power options and ensuring safe operation. By understanding the different types of switches, their functions, and how to troubleshoot common problems, you’ll be prepared for anything the road throws your way. Remember regular maintenance and safety precautions are your best allies in keeping your RV’s electrical system running smoothly.
Happy travels!
FAQ Insights
What happens if my battery switch is faulty?
A faulty switch can lead to no power, intermittent power, or even damage to your batteries or other electrical components. You might experience blown fuses or even a fire hazard in extreme cases.
How often should I inspect my battery switch?
Ideally, inspect your battery switch at least once a year or before each extended trip. Look for corrosion, loose connections, and signs of overheating.
Can I replace a battery switch myself?
Yes, but basic electrical knowledge is recommended. If you’re uncomfortable working with electricity, it’s best to consult a professional.
How do I choose the right battery switch for my travel trailer?
Consider the amperage of your batteries and other electrical components. Choose a switch with a sufficient amperage rating to handle the load.
